Removing aged varnish from a carved wooden door requires patience, restraint, and careful observation. The surface may look dull, cracked, or amber-colored, yet the original wood and earlier repairs can remain valuable. This introduction explains How to remove old varnish from a carved wooden door without flattening delicate details or damaging the timber beneath.
Furniture restoration expert Bob Flexner often promotes a careful finishing principle: “Remove only what must be removed.” That idea matters here. A harsh scraper can erase crisp leaves, beads, and hand-cut grooves within seconds. Chemical strippers may also soften old fillers or stain porous wood unevenly. Test gently first.
Begin by photographing the door and inspecting its hinges, carvings, joints, and previous coatings. A small hidden area can reveal whether the finish is shellac, lacquer, paint, or modern varnish. It can also expose earlier color layers that should remain. Wear suitable gloves, eye protection, and provide strong ventilation. Never rush the reaction.
A controlled approach usually combines a mild finish remover, wooden or plastic tools, soft brushes, and fine abrasive pads. Metal blades need exceptional care. They cut quickly.
Moisture is another concern. Excess liquid can swell joints and raise grain. Work in small sections, following the carving’s shape rather than forcing a flat sanding pattern. Some residue may remain in deep recesses. That is not always failure. In conservation, preserving authentic tool marks can matter more than achieving a perfectly uniform surface. I would question any method promising instant results, because carved doors rarely respond evenly. Final refinishing should wait until the wood is clean, dry, stable, and fully understood.
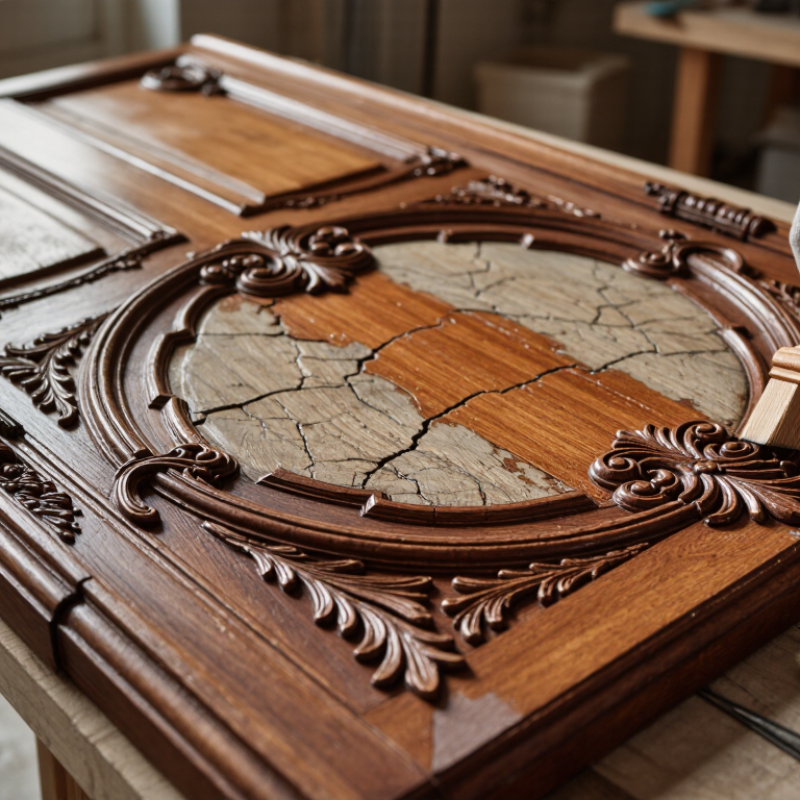
How to Remove Old Varnish from a Carved Wooden Door?
Assess the Door’s Wood, Finish, and Decorative Details
Before removing old varnish, inspect the door in strong, angled light. Look for cracked grain, soft spots, raised fibers, and loose joints. Press gently with a blunt tool near damaged areas. Healthy wood feels firm. Soft wood needs careful treatment.
Identify the existing finish before choosing a removal method. A glossy surface may be varnish, shellac, paint, or several older layers. Test a hidden corner with a small amount of suitable solvent. Watch for softening, color transfer, or a sticky texture. Stop if the wood darkens quickly. That reaction can reveal a weak stain beneath the finish. I once assumed a door had one coating, but three layers appeared around the lower carvings. It slowed the work and changed my approach.
Tips: Photograph the carvings first. Mark fragile edges with removable tape. Use a plastic scraper on broad areas, then clean carved grooves with wooden sticks and soft brushes. Avoid sharp metal tools. They can flatten leaves, beads, and small figures. Work in short sessions, especially around end grain. Keep the surface slightly controlled, not soaked. Ventilate the room and wear suitable eye and hand protection. A hidden test is never wasted. It may still fail to represent every area, so reassess when the wood or finish changes.
| Assessment Area | What to Check | Reliable Clues or Data | Effect on Varnish Removal | Recommended Action |
|---|---|---|---|---|
| Wood species and hardness | Identify whether the door is made from a softwood, hardwood, veneer, or mixed construction. | Softwoods generally dent more easily; hardwoods usually resist scraping better. A thin, repeating grain pattern may indicate veneer. | Aggressive sanding can flatten soft wood or cut through veneer before the finish is removed. | Start with the least abrasive method and test in an inconspicuous area. Use hand tools around grain transitions. |
| Moisture condition | Look for swelling, cupping, open joints, soft areas, fungal discoloration, or water staining. | Wood moisture content around 6%–12% is commonly suitable for interior woodwork; persistently higher readings require investigation. | Moisture-damaged wood may crumble, stain, or react unpredictably to heat and liquid strippers. | Repair leaks and allow the door to dry and stabilize before stripping. Do not seal damaged wood under a new finish. |
| Finish thickness and age | Examine peeling, cracking, cloudy areas, ambering, and ridges along carved edges. | A brittle, dark amber film may be an aged oil-based varnish; a hard, glass-like layer may be a catalyzed or modern coating. | Thick or layered finishes may require repeated applications rather than one aggressive treatment. | Remove loose material first, then test a small area with a suitable gel stripper or controlled mechanical method. |
| Finish identification test | Test an unseen spot using cotton swabs and small amounts of compatible solvents, following safety instructions. | A finish that softens or becomes tacky indicates solvent sensitivity; no change may indicate a highly resistant coating. | An incorrect solvent can dissolve color, smear the finish, or drive residue into porous wood. | Use the mildest effective approach, document the test result, and stop if the wood color or surface begins to change. |
| Carved decorative details | Inspect relief depth, undercuts, beads, flutes, foliage, rosettes, and sharp arrises. | Fine carvings can hold finish in recesses where flat scrapers and sanding blocks cannot reach. | Power sanding may erase crisp profiles, round edges, and remove historically important tool marks. | Use shaped plastic scrapers, soft brass or natural-bristle brushes, and dental-style picks only with light pressure. |
| Paint, stain, or pigment beneath varnish | Check whether the dark appearance comes from natural aging, stain, paint, or accumulated grime. | Uneven color in recesses may be intentional glaze or stain rather than dirt. | Complete stripping can remove the original color layer and change the door’s appearance permanently. | Decide whether the goal is full removal, surface cleaning, or selective finish reduction before starting. |
| Fasteners and hardware | Locate hinges, locks, escutcheons, nails, screws, glass, and removable trim. | Metal hardware can corrode or become stained by alkaline or solvent-based products. | Chemical residue around joints may damage metal, glazing compounds, or adjacent painted surfaces. | Remove hardware where practical and protect non-wood components with solvent-resistant masking materials. |
| Heat sensitivity | Check for veneers, glue joints, inlays, resin repairs, and nearby glass. | Heat can soften some finishes but may also loosen veneer, damage adhesives, or crack glass through thermal shock. | A heat gun is less predictable on layered or veneered doors than on solid, plain boards. | Prefer chemical or hand methods near veneer, inlays, joints, and glazing. If heat is tested, keep it moving and use the lowest effective setting. |
| Test patch and compatibility | Choose a hidden area with representative grain, carving depth, and finish thickness. | A useful test patch should be large enough to show dwell time, residue, color change, and wood response. | A method that works on a flat edge may fail in deep relief or on end grain. | Record product type, dwell time, tool used, number of applications, and the final surface condition. |
| Safety and ventilation | Assess ventilation, ignition sources, protective equipment, dust control, and waste handling. | Many stripping products produce vapors or skin hazards; sanding old coatings can create harmful dust, especially if the coating composition is unknown. | Unsafe conditions can expose workers and contaminate the work area. | Follow the product safety data, wear suitable eye and skin protection, improve ventilation, and collect residue as regulated waste. |
| Final surface preparation | Check for remaining residue, raised grain, scratches, open pores, and uneven color after removal. | Residual stripper or embedded finish can interfere with staining, oiling, or clear coating. | Applying a new finish too soon can cause poor adhesion, cloudiness, or uneven sheen. | Clean according to the selected stripping method, allow adequate drying, then lightly smooth by hand without softening carved profiles. |
Before touching an old carved wooden door, gather protective gear and inspect the coating. Wear chemical-resistant gloves, sealed goggles, long sleeves, and disposable coveralls. Use a properly selected respirator only after reading the stripper’s safety data sheet. Open windows and create cross-ventilation, but avoid blowing dust through the house.
Old paint may contain lead. The U.S. EPA’s Renovation, Repair and Painting guidance treats coatings in pre-1978 buildings as potential lead hazards. Do not dry-sand them. Use plastic sheeting, a HEPA vacuum, and controlled wet methods where required. Choose a low-odor, wood-compatible stripper, then test it inside one carved recess. Small tests matter. The first product may soften varnish but stain bare wood.
Prepare plastic scrapers, nylon detail brushes, wooden picks, absorbent pads, and a metal waste container with a secure lid. Avoid steel wire brushes; they can tear soft grain and flatten crisp carving. Apply stripper in a thin layer, wait according to its safety sheet, and remove softened finish gently. OSHA lists methylene chloride exposure limits of 25 ppm over eight hours and 125 ppm over fifteen minutes. Products containing it require strict controls, training, and legal compliance.I once underestimated residue in deep grooves. A second cleaning pass was necessary. That extra time protected the wood better than aggressive scraping.
Removing old varnish from a carved wooden door requires patience, not force. I begin by photographing every detail and testing a hidden area. A plastic scraper, soft nylon brush, cotton swabs, and low-tack tape help protect fragile edges. I avoid metal blades near raised carving. They can leave cuts that become obvious after refinishing.
A gel-type stripper usually gives better control than a thin liquid. I apply a small amount with a disposable brush, keeping it inside one section. The National Park Service’s Preservation Brief 28 recommends gentle, localized testing before treating historic woodwork. I wait only as directed, then lift softened varnish carefully. For grooves, wooden sticks and trimmed brushes work better than aggressive sanding. Sandpaper can flatten crisp leaves and geometric borders quickly.
Keep the wood stable.
The 2021 USDA Forest Products Laboratory Wood Handbook explains that tangential shrinkage can be roughly twice radial shrinkage in many wood species. Excess water or heat may therefore distort thin carved parts. I use minimal moisture and allow slow drying. Ventilation and protective equipment matter, because stripping products can irritate skin and lungs. The U.S. National Institute for Occupational Safety and Health recommends controlling solvent vapors through ventilation and exposure management. I sometimes leave a thin residue in deep recesses rather than risk a gouge. That choice is imperfect, but preserving the carving matters more than achieving a spotless surface.
Typical working time per square metre, using methods that help protect carved details
Chemical stripping generally removes softened varnish faster than hand sanding, while detailed scraping takes longer because each carving must be treated carefully. Heat guns can work quickly, but excessive heat may scorch the wood or damage delicate edges. Always test the chosen method on a small hidden area first.
After softening the old varnish, lift it with a plastic scraper and a narrow wooden pick. Work slowly around carved leaves, grooves, and corner joints. Metal tools can bruise the grain and leave bright scratches that become obvious after finishing. I usually clean small areas with a barely damp cloth, then dry them immediately. Do not flood the surface. Water can enter end grain and loosen fragile joints.
The door is probably not that wet, but the figures explain why aggressive washing causes trouble. Let the exposed wood rest indoors for at least 24 hours. Keep ventilation steady.
Use 180-grit abrasive paper with a soft sanding block, following the grain. Fold the paper for tight carvings, but avoid pressing into sharp profiles. Vacuum dust with a brush attachment, then wipe with a dry, lint-free cloth. Feel the surface with your fingertips. Roughness often remains inside deep cuts. I sometimes over-sand one small detail, especially when the old coating hides uneven repairs. That mistake is difficult to reverse. Stop when the wood feels clean and even, not perfectly pale. Natural stains, small dents, and darker grain can be part of the door’s history.
Removing old varnish from a carved wooden door is preparation, not a race. In my workshop, I photograph each carving and label loose hardware. This record helps during repairs, especially when hinges or handles have aged unevenly. I place the door flat on padded supports, then remove dust with a soft brush and vacuum. Never soak carved wood. Water can swell joints and soften fragile edges. Test the remover on a hidden corner. A small patch may reveal old stain, filler, or unexpected wood damage.
I wear eye protection, chemical-resistant gloves, and keep the room well ventilated. I use a scraper with rounded corners and nylon or brass brushes for recessed details. Sharp metal tools can leave bright cuts that remain visible after staining. Apply remover in a controlled layer, following its safety instructions. Work in small sections. Let the softened finish lift without force. Wooden picks clear stubborn grooves more gently than blades. Sand only after the surface dries fully. Begin with fine abrasive paper and follow the grain. Details punish haste.
After stripping, inspect joints, splits, insect holes, and dark patches. Mark repairs with removable tape rather than sanding them away. A clean surface makes repair choices clearer. Fill damage, replace weak sections, or preserve honest tool marks. Before staining, remove dust and let the door acclimate indoors. Test the stain on hidden wood first. Carved surfaces absorb unevenly, and one patch may become too dark. I sometimes expect a perfect color match and regret rushing it. Slower preparation protects the door’s character and supports a more even new finish.
Examine it under strong, angled light. Look for cracked grain, soft spots, raised fibers, and loose joints. Press damaged areas gently with a blunt tool. Healthy wood feels firm. Soft wood needs slower treatment.
Test a hidden corner with a small amount of suitable solvent. Watch for softening, color transfer, or stickiness. Stop if the wood darkens quickly. Several old layers may be present, especially near lower carvings.
Photographs record fragile leaves, beads, figures, and edge profiles before work begins. Use removable tape to mark vulnerable areas. This simple record can reveal accidental changes later. I sometimes underestimate small details.
Use a plastic scraper on broad surfaces. Use wooden sticks and soft brushes inside grooves. Avoid sharp metal tools. They can flatten carvings and leave bright scratches. Work slowly.
Work in short sessions around end grain and delicate joints. Keep the surface controlled, not soaked. Clean small areas with a barely damp cloth. Dry them immediately. Water can loosen fragile joints.
Let the door rest indoors for at least 24 hours. Keep ventilation steady. Wood changes size as moisture leaves it. Aggressive washing may increase movement and damage joints.
Use 180-grit abrasive paper with a soft sanding block. Follow the grain. Fold the paper around tight carvings without pressing into sharp profiles. Sand until the surface feels clean and even, not perfectly pale.
Vacuum dust with a brush attachment, then use a dry, lint-free cloth. Feel deep cuts with your fingertips. Stop when roughness is reduced. I once over-sanded a small detail, and the lost shape could not be restored.
How to remove old varnish from a carved wooden door begins with carefully assessing the wood, existing finish, and decorative details. Before starting, gather protective gear, suitable stripping materials, scrapers, brushes, cloths, and gentle sanding tools. Test the chosen method on a small, hidden area to understand how the varnish reacts and to avoid harming the wood or delicate carvings. Work gradually, applying the remover as directed and lifting softened varnish without forcing tools into recessed patterns.
Once the old finish is removed, clean the surface thoroughly to eliminate residue and dust. Allow the door to dry completely, then smooth rough areas with fine abrasives while preserving the carved details. Inspect the exposed wood for cracks, stains, or other damage and complete any needed repairs. The prepared door can then be conditioned for staining, painting, sealing, or another suitable protective finish.

Weston Door