A sagging wooden door rarely fails without warning. It may scrape the threshold, pinch near the top corner, or leave an uneven gap along the frame. These signs often point to loose hinge screws, compressed timber, worn hinge pins, or shifting door weight. Learning how to adjust wooden door hinges to stop sagging can restore smooth movement without replacing the entire door.
This guide explains how to inspect the problem and make careful hinge adjustments. You will need a screwdriver, a level, a wooden wedge, and possibly longer screws. Check the top hinge closely. It carries much of the door’s weight and often loosens first. Support the door before removing any screw. A small wedge beneath the slab can prevent sudden movement and protect your fingers.
Do not tighten every screw blindly. That can twist the frame or make the door bind. Test the door after each adjustment, even if the change seems minor. In some cases, the hinge is not the real cause. Swollen wood, damaged jambs, or poor installation may require additional repairs. This distinction matters. A practical inspection saves time and prevents repeated adjustments. The process is usually simple, but older doors can behave unpredictably. Patience helps more than force.
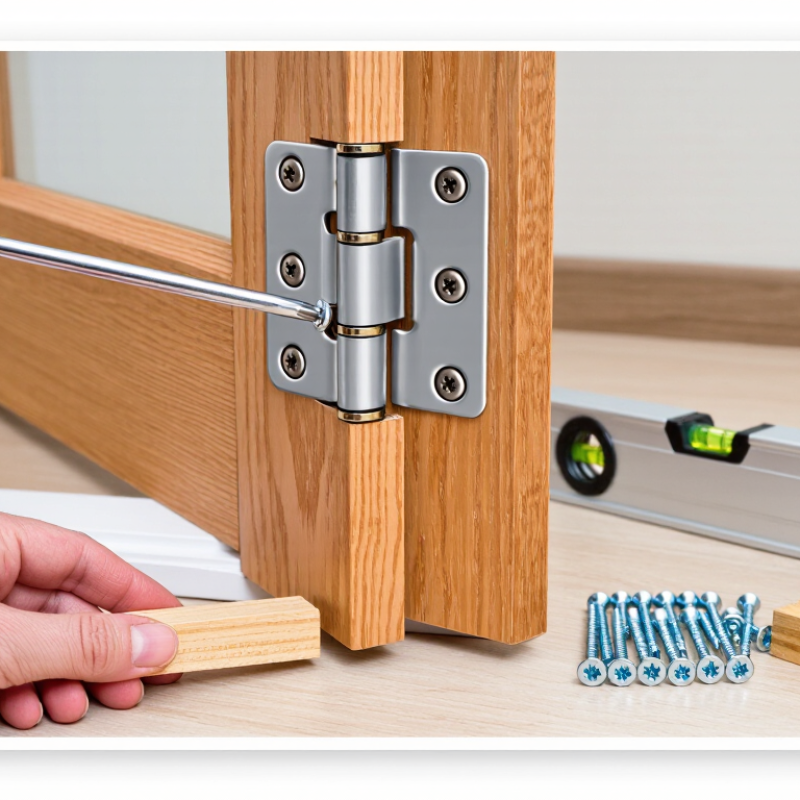
A sagging wooden door rarely blames the hinges alone. The first clue is often a narrow gap at the top latch side. Rub marks along the lower frame can reveal the same problem. Open the door halfway and lift the handle gently. Excessive movement points toward loose or worn hinges.
Loose screws are a common cause. Repeated opening can enlarge the holes in soft timber. Short screws may also fail to grip the framing behind the jamb. The door’s weight matters too. Solid wood doors, glass panels, or added hardware can overload small hinges.
Humidity creates another variable. Wood may swell, shrink, or twist as moisture levels change. I once adjusted hinges before checking the frame, and the door shifted again after a damp week.
Look closely at the hinge leaves. Bent metal, crushed wood, or a dark rubbing line suggests stress or poor alignment. A hinge pin may also be worn, making the door droop even when screws feel tight. Check whether the jamb remains plumb with a level. If the jamb has moved, hinge adjustment alone may hide the real fault.
Do not force a screw into damaged wood. Test one change at a time, then close the door slowly. A small scrape near the threshold can expose floor movement, uneven fitting, or a swollen bottom edge. The cause is not always obvious.
Before adjusting a sagging wooden door, gather the right tools. You will need a screwdriver, a drill, a level, a hammer, wood shims, and several longer screws. Keep a flashlight nearby for dark hinge recesses. Safety glasses protect your eyes from falling dust. A small brush can clear debris around the hinge plates.
Use a firm doorstop or folded cardboard to support the door’s weight. Open and close the door slowly, then observe where the edge rubs. Check whether the hinges are loose, bent, or buried under old paint. Mark each loose screw with a pencil before removing anything. This simple step prevents confusion later. Do not force a stripped screw. It may enlarge the hole and weaken the wood. I have found that a hinge can look secure while its screws barely grip the frame. That mistake is easy to miss. Clean the hinge area with a dry cloth, and remove nearby objects that could obstruct movement. Keep the door supported throughout the inspection. A level helps confirm whether the frame has shifted, although it cannot identify every cause of sagging. Sometimes the door itself is slightly warped. Pause and reassess before making several adjustments at once. Small changes are safer.
| Step | Item or Action | Recommended Specification | Purpose | Preparation Check |
|---|---|---|---|---|
| 1 | Phillips screwdriver | Size matched to the existing hinge screws | Tighten or remove hinge screws without damaging the screw heads | The screwdriver fits firmly and does not slip when turned |
| 2 | Wood screws | Matching head type; slightly longer screws may help when existing holes are loose | Replace stripped, missing, or ineffective hinge screws | Choose screws that do not extend through the door or frame |
| 3 | Wooden door wedge | Firm wedge sized to support the door weight | Hold the door in position and reduce pressure on the hinges | The door is supported without forcing it upward |
| 4 | Spirit level | Small or standard level with a readable vial | Check whether the door edge and frame are vertically aligned | Place the level on the latch-side edge and compare before adjustment |
| 5 | Measuring tape | Metric or imperial scale with millimetre or 1/16-inch markings | Measure uneven gaps around the door | Record the top, middle, and bottom gaps on the latch side |
| 6 | Utility knife or scraper | Sharp, controlled edge suitable for removing paint buildup | Clear paint, debris, or sealant from hinge edges | Work carefully to avoid cutting the wood or damaging the finish |
| 7 | Cleaning cloth | Dry, lint-free cloth | Remove dust and loose debris from hinge plates and screw holes | Hinge surfaces are clean and visible before adjustment |
| 8 | Inspect hinge leaves | Check the top, middle, and bottom hinges | Identify loose screws, bent leaves, damaged knuckles, or missing pins | Replace damaged hardware instead of forcing an adjustment |
| 9 | Protect the work area | Clear floor space and place a protective covering nearby | Prevent trips, scratches, and damage while supporting the door | The door can open safely and the tools are within reach |
| 10 | Record the initial condition | Note rubbing points, gap measurements, and latch alignment | Create a reference for evaluating the adjustment | Door closes smoothly enough to test after each small change |
Safety note: Support the door before loosening hinge screws, and avoid removing all hinge screws at the same time.
How to Adjust Wooden Door Hinges to Stop Sagging?
A sagging wooden door often scrapes the floor or catches against the latch. The hinge screws are usually the best place to begin. Open the door halfway and support its weight with a wedge. Check every screw, including those hidden near the hinge knuckle. Tighten loose screws with a manual screwdriver. A drill can strip soft wood quickly. Stop when the hinge sits firmly against the door and frame.
If a screw spins without tightening, the timber may be worn. Replace it with a longer screw that reaches solid framing, but avoid forcing an oversized screw into the hinge leaf. The hinge should remain flat. I once overtightened a screw and pulled the hinge edge into the wood. The door improved briefly, then sagged again. That mistake showed me that pressure cannot replace proper support. If the original holes are badly damaged, remove the screw, pack the opening with small hardwood slivers and wood adhesive, then allow it to set before reinstalling the screw.
A thin shim can correct a hinge that sits too deeply in the recess. Use sturdy cardboard or a purpose-cut wood strip behind the hinge leaf. Add one layer at a time. Too much thickness can twist the door and create a new latch problem. Replace a bent or cracked hinge rather than adjusting it endlessly. Test the door after each change, watching the top gap, latch alignment, and floor clearance. Small changes matter.
Tighten, replace, or shim the hinge screws according to the measured amount of door sag.
Use the smallest effective repair first: tighten loose hinge screws for minor movement, replace stripped or short screws when the hinge will not hold, and add a thin shim behind the hinge leaf when the door remains misaligned after the screws are secure. The sag ranges shown are practical repair thresholds for a typical interior wooden door.
A sagging wooden door often reveals itself before the hinge does. The latch scrapes, the top corner rubs, or the gap narrows near the hinge side. Open the door halfway and support its weight with a wedge or folded cardboard. This prevents the door from pulling against loose screws while you work. Inspect each hinge leaf. The leaves should sit flush with the wood, not tilt outward. Tighten loose screws gently, then close the door and inspect the gaps. Aim for an even reveal along the top and both side edges.
If the door still drops, loosen one hinge at a time and realign it. A thin wood shim behind the hinge can correct a shallow misalignment. Use a sharp chisel, and keep the hinge mortise clean and level. Do not force the screws; stripped holes can make the problem worse. I once tightened the top hinge too aggressively, and the door swung unevenly afterward. That mistake taught me to make small adjustments and test the swing repeatedly. Move the door slowly from closed to fully open. Watch for rubbing, a drifting swing, or a latch that misses the strike plate. If the door swings freely but the gaps look uneven, check the frame before cutting wood. Frames can settle, and hinge adjustment alone may not correct them. Leave the door closed for several minutes, then test it again.
After adjusting the wooden door hinges, test the final fit before tightening every screw.
Close the door slowly and watch the top corner near the latch. It should clear the frame without rubbing. Check the gap along both sides. A steady, narrow gap usually shows good alignment. Open and close the door several times. Listen for scraping, clicking, or unusual resistance. Do not trust one successful closing.
Tips: Place a thin card between the door and frame. The card should slide through with light resistance. Test the latch, handle, and weather seal separately. If the door swings open or closed by itself, the hinges may still be uneven. Recheck the hinge plates and tighten loose screws carefully. Over-tightening can distort the wood and create a new problem.
Prevent future sagging by checking the screws after several days of normal use. Wood can compress around older screw holes, especially near the upper hinge. If a screw turns without gripping, replace it with a slightly longer screw that fits the hinge and frame safely. Keep the hinge knuckles clean and apply a small amount of suitable lubricant when needed. I once tightened the top hinge too much, and the door began rubbing on the opposite side. That mistake was useful. Final adjustment should be gradual, with repeated testing after each small change.
Look for a narrow gap near the top latch side. Rub marks along the lower frame are another clue. Open it halfway and gently lift the handle. Excessive movement suggests hinge trouble.
Loose screws, worn hinges, and enlarged screw holes are common causes. Heavy doors or added hardware may overload small hinges. Humidity can also swell, shrink, or twist the wood.
Yes. Use a level to check whether the jamb remains plumb. A shifted frame can make hinge adjustments ineffective. The real fault may be elsewhere.
Open the door halfway and support its weight with a wedge or folded cardboard. This reduces pulling pressure on loose screws. Work gently.
Tighten loose screws gently, then close the door and inspect the gaps. If it still drops, loosen one hinge at a time. A thin wood shim behind a hinge may correct slight misalignment.
Check for bent metal, crushed wood, tilted leaves, or dark rubbing lines. The hinge leaves should sit flush with the wood. A worn hinge pin can also cause drooping.
Do not force screws into damaged wood or stripped holes. Use a sharp chisel to keep the hinge mortise clean and level. Test one change at a time. Go slowly.
Check the frame, threshold, and bottom edge for movement or swelling. Watch the swing from closed to fully open. I once tightened a top hinge too much, and the door swung unevenly afterward. Small adjustments work better.
How to adjust wooden door hinges to stop sagging begins with identifying why the door is drooping. Common causes include loose hinge screws, worn screw holes, damaged hinges, or a door that has shifted out of alignment. Gather a screwdriver, drill, replacement screws, wood filler or shims, and a level. Support the door safely, inspect each hinge, and check whether the screws are firmly seated.
Tighten loose screws first, replacing short or damaged screws with longer ones when appropriate. If the screw holes no longer grip, fill them with suitable wood material before reinstalling the screws, or use a thin shim to correct the hinge position. Adjust one hinge at a time while checking the door’s gaps, latch, and swing. Open and close the door several times to confirm that it moves smoothly without rubbing. Finally, inspect the screws and hinges periodically, keep them secure, and address small alignment problems early to help prevent future sagging.

Weston Door