A cracked solid wood door can look minor, yet the opening may reveal movement beneath the finish. Seasonal humidity, loose joints, aging timber, and impact damage can all create different repair problems. This guide explains How to fill cracks in a solid wood door panel with practical, careful methods. It focuses on identifying the crack before choosing a filler. That small decision matters.
Experienced woodworkers usually begin by checking the door’s moisture exposure, grain direction, and surrounding finish. A narrow surface split needs different treatment from a deep separation through the panel. Dust, peeling paint, and soft wood must be removed gently. Otherwise, the new filler may detach after a few weeks. The repair area should feel dry and firm. It should not be rushed.
The process may involve cleaning, widening a weak crack slightly, applying suitable wood filler, sanding, sealing, and matching the finish. Product labels should always be followed, especially for curing times and ventilation. A flexible filler may suit small seasonal movement, while a stronger repair could require professional joinery. Not every repair will disappear completely. That is worth admitting. Wood changes with temperature and moisture, even after careful restoration. A visible grain mismatch may remain, but a stable, well-sealed repair can still look clean and last for years. Careful inspection often prevents a larger and more expensive door failure.
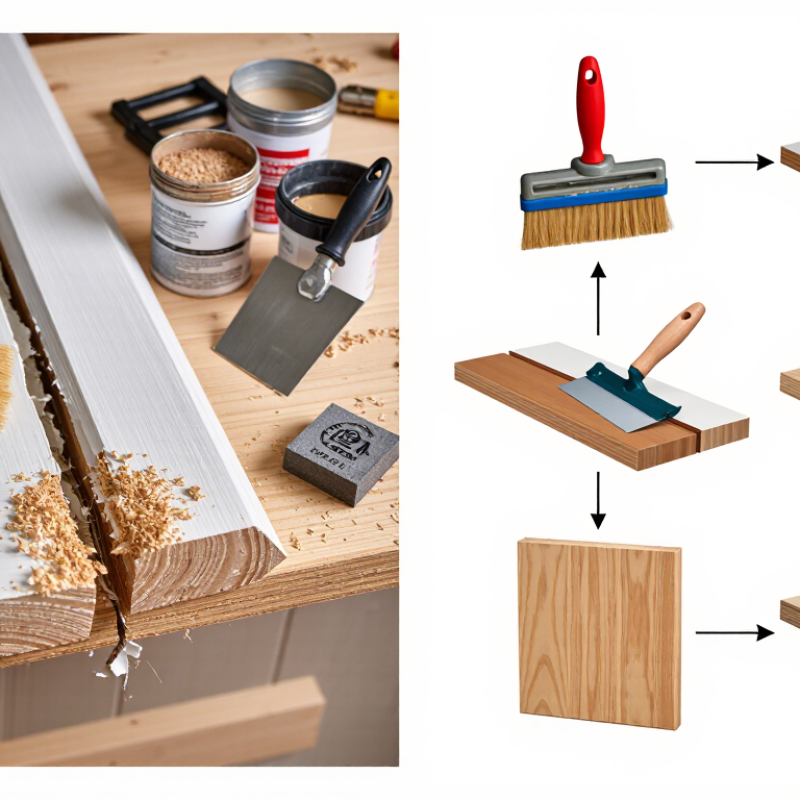
What Causes Cracks in a Solid Wood Door?
Solid wood door cracks rarely appear without a cause. Moisture movement is usually the main trigger. The USDA Forest Products Laboratory’s Wood Handbook reports tangential shrinkage of about 6–12% from green to oven-dry conditions. Radial shrinkage commonly reaches 3–6%. These changes become visible when door panels, rails, and stiles respond differently.
Indoor humidity makes the problem worse. The National Wood Flooring Association recommends maintaining interior relative humidity near 30–50% for stable wood products. A heated room in winter may fall below that range. Summer air can push moisture much higher. The door may swell, then contract after drying. Small openings often form along panel edges, joints, or end grain. They look harmless at first.
Cracks can also reflect poor seasoning or rushed installation. Direct sunlight heats one face of the door, while the shaded side stays cooler. Uneven hinges, excessive paint buildup, and tight framing add stress. The USDA Wood Handbook explains that wood continually exchanges moisture with surrounding air until reaching equilibrium. That process is slow, but relentless. A crack near a hinge deserves careful inspection. It may indicate movement in the frame, not just dry wood. I once blamed a narrow split on age alone; the real issue was winter heating and a sealed room. That mistake is worth remembering.
How to Inspect and Prepare the Cracked Wood
Before filling a crack in a solid wood door, inspect its location, depth, and movement. I start in daylight, then use a flashlight across the surface. Side lighting reveals raised edges, old filler, and fine splits.
Check the door’s top, bottom, hinge side, and lock rail carefully. Cracks near hinges or joints may indicate stress, not simple drying. Press both sides gently. Any movement deserves attention. A crack that extends through the panel needs more than cosmetic repair. Measure its width with a thin gauge, and record the result. Small details matter.
The wood must be clean, dry, and stable. Remove loose fibers with a sharp chisel, working along the grain. Do not widen sound wood unnecessarily. Brush out dust, then vacuum the opening. I usually check moisture with a meter, but I also trust simple observation. Swollen edges, dark staining, or a cool damp feel suggest hidden moisture. Let the door dry naturally before repair.
I once rushed this step and sealed a damp crack. It reopened within weeks. That mistake was avoidable. Sand only the damaged edges, using fine abrasive paper. Keep the surrounding finish intact where possible. If the crack moves, reaches a joint, or surrounds hardware, ask a qualified carpenter to inspect the door before filling it.
Which Materials and Tools Are Needed for the Repair?
Repairing a cracked solid wood door starts with identifying movement, not covering the opening. In my workshop, narrow cracks often reopen when indoor humidity changes. I use a flashlight, stiff brush, vacuum, utility knife, and moisture meter when available. The knife should remove loose fibers, not enlarge sound wood. A small scraper helps clear old paint. Wear eye protection and a dust mask while sanding. Keep the door supported, and inspect the hinges if the crack follows the grain.
For hairline cracks, choose a flexible, paintable wood filler. For deep or spreading gaps, an epoxy-based repair compound usually provides better structure after curing. Use clean mixing sticks, a disposable board, and a narrow putty knife. A syringe can place compound into a tight cavity, but it is not essential. Wood glue alone can disappoint because it may shrink as the door moves. Press filler slightly below the surface, then follow the full curing time. Rushing this step causes soft patches.
After curing, use 120-grit sandpaper, then 180-grit for a smoother transition. A sanding block keeps the repair flat; fingers can create a shallow hollow. Wipe away dust before applying primer and matching paint or clear finish. Test the finish on an unseen edge. Colors can change after drying. I once sanded too aggressively near raised grain and had to rebuild the edge. That mistake taught me to inspect under angled light between passes. If the crack continues through the stile or rail, consult a qualified door repair professional.
2026 Top Guide: How to Fill Cracks in a Solid Wood Door?
Recommended repair systems vary with crack width. Use fine wood filler for hairline cracks, epoxy wood filler for medium cracks, and a backing rod with epoxy filler for wider or deeper gaps.
Basic tools include a putty knife, sanding block, utility knife, clean cloth, and paintbrush. Allow the filler to dry or cure fully before sanding, priming, and repainting the door.
How to Fill, Sand, and Smooth the Door Cracks
2026 Top Guide: How to Fill Cracks in a Solid Wood Door
How to Fill, Sand, and Smooth the Door Cracks
A cracked solid wood door needs careful preparation, not a quick layer of filler. I begin by checking whether the crack is dry, clean, and still moving. A narrow seasonal crack may reopen when humidity changes. That detail matters.
Remove loose fibers with a sharp putty knife. Avoid widening the opening unnecessarily. Vacuum the dust, then wipe the area with a slightly damp cloth. Let it dry completely. For a shallow crack, press quality wood filler into the opening with a flexible scraper. Push across the grain first, then along it. This reduces trapped air. Deep cracks may need several thin applications. Thick filler often shrinks or dries unevenly. I learned that lesson after sanding a repair twice.
Allow the filler to cure according to its instructions. Do not sand it while the surface still feels cool or soft. Start with medium-grit sandpaper wrapped around a sanding block. Sand gently along the wood grain. Finish with fine-grit paper until the repair feels level when touched with closed eyes. Feel the surface.
Wipe away all dust before applying primer, stain, or paint. Check the repair from different angles under strong light. Small ridges become obvious after finishing. If the crack returns, investigate door movement, moisture, or loose joints instead of adding more filler. A perfectly invisible repair is not always realistic, but a stable, smooth surface is achievable.
How to Seal and Refinish the Repaired Door Surface
After filling cracks in a solid wood door, let the repair cure fully before sealing it. The USDA Forest Products Laboratory’s Wood Handbook explains that wood changes dimension as its moisture content changes. A surface can look dry while the filler remains soft underneath. Press the repaired area gently; it should feel firm, not rubbery. Sand with 120-grit paper, then finish with 180-grit paper. Remove dust with a clean, slightly damp cloth.
Seal the exposed repair with a compatible wood primer or penetrating sealer. Cover the crack, nearby end grain, and the lower door edge carefully. The U.S. Environmental Protection Agency recommends indoor relative humidity between 30% and 50%, which helps reduce repeated wood movement after refinishing. Apply thin coats instead of one heavy layer. Heavy coats often wrinkle or trap moisture. I would not call the first sanding pass final. Light scratches may appear only after the sealer dries.
Apply two finish coats with a quality brush or short-nap roller, following the product’s stated recoat time. Keep the door open until the surface loses its tackiness. The Window and Door Manufacturers Association emphasizes proper finishing on exposed wood edges and surfaces because incomplete coverage allows moisture intrusion. Inspect the repaired area after several days, especially near hinges and the threshold. If the crack reopens, the filler was probably not the real solution. Door movement, poor drainage, or unstable humidity may need attention before another cosmetic repair.
FAQS
Check whether the crack is dry, clean, and still moving. Remove loose fibers with a sharp putty knife. Vacuum dust, then wipe gently with a damp cloth. Let the surface dry completely.
Not always. A narrow crack may reopen when humidity changes. Check door movement and moisture before making a cosmetic repair. The crack may be warning you.
Press filler firmly into the opening with a flexible scraper. Push across the grain, then along it. Deep cracks usually need several thin applications. Thick filler can shrink or dry unevenly.
Wait until the filler feels firm and fully cured. Do not sand while it feels cool, soft, or rubbery. Start with 120-grit paper on a sanding block. Finish with 180-grit paper.
Run closed eyes lightly across the repair. The area should feel level, without ridges or dips. Inspect it under strong light from several angles. Small flaws often appear later.
Yes. Wipe away sanding dust with a clean, slightly damp cloth. Let the surface dry before applying primer, sealer, stain, or paint. Dust can create rough spots.
Apply a compatible wood primer or penetrating sealer in thin coats. Cover the repaired crack, nearby end grain, and lower door edge. Heavy coats may wrinkle or trap moisture.
Keep indoor relative humidity around 30% to 50%. Stable humidity reduces repeated wood movement. Keep the door open until the finish loses its tackiness. Do not rush this part.
Investigate door movement, loose joints, moisture, drainage, hinges, and the threshold. Adding more filler may hide the symptom briefly. It may not solve the cause. I have learned that sanding twice is frustrating.
Conclusion
This guide explains how to fill cracks in a solid wood door panel by first identifying the likely causes, such as seasonal moisture changes, aging, impact, or improper installation. Begin by examining the crack’s length, depth, and surrounding area. Remove loose fibers, dust, old finish, and damaged material, then make sure the wood is clean and completely dry before starting the repair.
The process covers the tools and materials commonly needed, including wood filler or suitable repair compound, a putty knife, sandpaper, cleaning cloths, primer, and finishing products. Apply the filler gradually, pressing it firmly into the crack and slightly overfilling the surface. After it dries, sand the area smooth and blend the edges with the surrounding wood. Finally, seal and refinish the repaired section to protect it from moisture, improve its appearance, and help reduce the chance of future cracking.

 Weston Door